Dyson DC14 Vacuum: A Comprehensive Manual Guide (Updated 12/10/2025)
Welcome! This detailed guide unlocks the full potential of your Dyson DC14, offering essential tips and tricks for optimal cleaning performance and longevity․
Maximize Performance: Familiarize yourself with all controls and features before initial use, ensuring a seamless and effective cleaning experience every time․
User Information: Carefully review the important safety and operational guidelines provided within this manual to guarantee safe and efficient operation of your device․
Updated: 12/10/2025 13:42:01
The Dyson DC14 represents a significant leap in vacuum cleaner technology, engineered to deliver powerful suction and exceptional cleaning performance on various floor types․ This model, renowned for its cyclonic action, efficiently captures dirt, dust, and allergens without losing suction power as the bin fills․
Designed for homes with pets and allergy sufferers, the DC14 boasts advanced filtration systems that trap microscopic particles, improving indoor air quality․ Its lightweight and maneuverable design allows for effortless cleaning throughout your home, reaching even the most difficult areas․
This manual serves as your comprehensive guide to understanding and utilizing all the features of your Dyson DC14․ From initial setup and operation to maintenance and troubleshooting, we’ll cover everything you need to know to keep your vacuum running at peak performance for years to come․ Welcome to a cleaner, healthier home!
Explore the power of cyclonic technology!
Key Features and Technologies
The Dyson DC14 is packed with innovative technologies designed to revolutionize your cleaning experience․ At its core lies Radial Root Cyclone technology, maintaining consistent suction by separating dust and dirt from the airflow without clogging filters․ This ensures powerful, sustained cleaning performance․
A key feature is the self-adjusting cleaner head, automatically adapting to different floor types – from hard floors to carpets – for optimal contact and cleaning efficiency․ The HEPA filtration system captures 99․97% of particles as small as 0․3 microns, including allergens and bacteria, improving air quality․
Furthermore, the DC14’s lightweight construction and maneuverability make it easy to navigate around furniture and tight spaces․ Its durable build quality guarantees long-lasting reliability, while the easy-to-empty dust bin simplifies maintenance․ Experience the difference!
Advanced engineering for a spotless home․
Unboxing and Component Identification
Upon opening your Dyson DC14 box, carefully inspect the contents to ensure all components are present․ You should find the main body unit, the wand, the hose, the floor tool (with adjustable settings), and a combination tool for versatile cleaning․
Also included are a crevice tool for reaching tight spaces, a pre-motor filter (usually pre-installed), and documentation including this user manual․ Verify the presence of all parts listed in the included inventory sheet․
Familiarize yourself with each component’s function before assembly․ The floor tool’s brush bar is crucial for carpet cleaning, while the combination tool offers brush and suction options․ The wand and hose extend your reach, and the crevice tool tackles detailed areas․ Retain the packaging for potential future transport or storage․
Ensure a complete and organized setup․

Setting Up Your Dyson DC14
Begin assembly by securely connecting the wand and hose to the main unit, ensuring a firm click․ Prepare for powerful, efficient cleaning today!
Assembling the Dyson DC14
Step 1: Connecting the Wand – Carefully align the wand with the main body of the Dyson DC14, inserting it with a firm, decisive click until securely locked in place․ Ensure a tight seal to maintain optimal suction power during operation․
Step 2: Attaching the Hose – Next, connect the hose to the wand, again listening for a distinct click indicating a secure connection․ The hose provides extended reach for cleaning various areas throughout your home․
Step 3: Selecting the Floor Tool – Choose the appropriate floor tool for your cleaning surface․ The DC14 comes with various tools designed for different floor types, including hard floors and carpets․ Attach the selected tool to the end of the hose․

Final Check – Before powering on, double-check all connections to ensure they are secure․ A properly assembled Dyson DC14 will deliver maximum cleaning performance and efficiency․
Powering On and Initial Use
Powering On – Locate the power button, typically situated on the main body of the Dyson DC14․ Press the button firmly to activate the vacuum․ A visual or auditory cue will confirm successful power-up․
Initial Run – Before cleaning your floors, perform a brief initial run in an open area․ This allows you to familiarize yourself with the machine’s operation and ensure all components are functioning correctly․
Suction Check – Verify adequate suction by testing the vacuum on a small area rug or carpet․ You should feel a noticeable pull as the vacuum engages with the surface․

Floor Type Selection – Begin with the appropriate floor setting for your surface․ Adjust as needed to optimize cleaning performance and prevent damage to delicate flooring․ Enjoy your newly cleaned home!

Operating the Dyson DC14
Mastering Operation: This section details how to effectively utilize your Dyson DC14, covering controls, suction adjustments, and optimal floor setting selections․
Efficient Cleaning: Learn to navigate various surfaces and maximize cleaning power for a spotless home environment․
Understanding the Controls
Power Button: Located prominently on the machine, the power button initiates and terminates operation; a single press activates, another deactivates․
Suction Control: The DC14 features variable suction control, adjustable via a slider or dial, allowing optimization for different floor types and debris levels․
Floor Type Selector: A crucial element, this selector adjusts brush bar height and suction for carpets, hard floors, and delicate surfaces, preventing damage and maximizing cleaning․

Wand Release Button: Pressing this button detaches the wand for above-floor cleaning, enabling access to tight spaces and upholstery․
Hose Connection: The hose securely connects to the main body, providing extended reach and versatility during cleaning operations․
Bin Empty Release: A simple button press releases the dust bin for hygienic emptying, maintaining optimal suction performance․
Filter Access: Easily accessible filter compartments allow for regular cleaning and maintenance, ensuring air quality and machine longevity․
Familiarization is key to unlocking the DC14’s full potential․
Adjusting Suction Power
Variable Suction Control: The Dyson DC14 offers adjustable suction, crucial for diverse cleaning tasks․ Lower settings preserve delicate fabrics and reduce energy consumption․
Maximum Suction: Utilize maximum suction for deep carpet cleaning and stubborn debris, ensuring thorough removal of dirt and allergens․
Automatic Mode: Some models feature an automatic mode, intelligently adjusting suction based on floor type and detected resistance․
Slider/Dial Adjustment: Suction is typically adjusted via a slider or dial, providing precise control over cleaning power․
Impact on Performance: Lower suction extends runtime (cordless models) and reduces motor strain, while higher suction maximizes cleaning effectiveness․
Floor Type Considerations: Hard floors benefit from lower suction to prevent scattering, while carpets require higher suction for deep cleaning․
Monitoring Suction: Pay attention to the machine’s performance; reduced suction indicates a need for filter cleaning or bin emptying․
Optimizing suction ensures efficient and effective cleaning․
Using Different Floor Settings
Floor Type Selection: The Dyson DC14 excels on various floor types, but proper setting selection is vital for optimal performance and floor protection․
Carpet Mode: Engage carpet mode for deep cleaning, activating the brush bar for agitation and maximum suction to lift embedded dirt․
Hard Floor Mode: Switch to hard floor mode to disable the brush bar, preventing scratching and scattering of debris on delicate surfaces․
Automatic Floor Detection: Certain DC14 models automatically detect floor types and adjust settings accordingly, simplifying operation․
Switching Settings: Floor setting adjustments are typically made via a selector switch or button on the machine’s body;
Combination Tools: Utilize combination tools for transitioning between floor types seamlessly during cleaning sessions․
Optimizing Results: Correct floor setting usage maximizes cleaning efficiency and minimizes wear and tear on both the machine and your floors․
Proper floor setting selection is key to a spotless home․

Maintenance and Cleaning
Regular upkeep ensures peak performance and extends the lifespan of your Dyson DC14 vacuum․ Consistent cleaning of filters and the bin is crucial!
Maintain optimal suction and hygiene with these simple steps․
Emptying the Dust Bin
Regularly emptying the dust bin is vital for maintaining optimal suction power and cleaning performance of your Dyson DC14․ A full bin significantly reduces efficiency․
Procedure: First, detach the bin from the main body of the vacuum – typically a red release button initiates this process․ Hold the bin over a suitable waste receptacle․ Press the bin’s release lever (usually located on the underside) to open the bottom and allow debris to fall out․
Important Note: Ensure the bin is completely empty before reattaching it․ Periodically wipe down the inside of the bin with a dry cloth to remove any lingering dust or residue․ Avoid using water or detergents, as these could damage the bin’s components․ Reattach securely until you hear a click․
Frequency: Empty the bin after each use, or more frequently if cleaning particularly dusty areas․
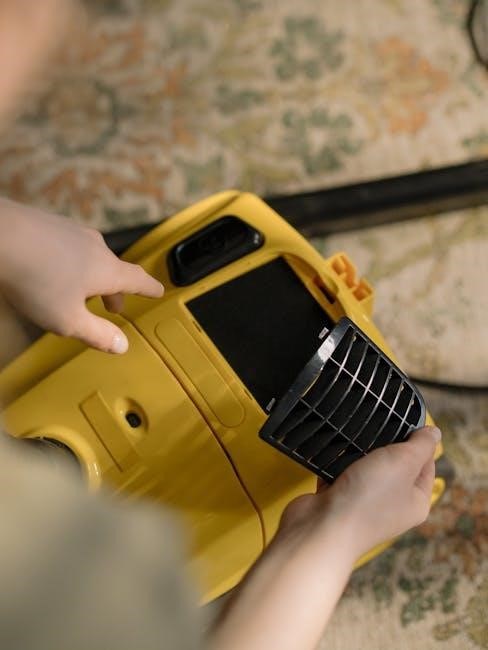
Washing the Pre-Motor Filter
Maintaining a clean pre-motor filter is crucial for sustaining strong suction and protecting your Dyson DC14’s motor․ A dirty filter restricts airflow, diminishing cleaning effectiveness․
Procedure: Locate the pre-motor filter – usually found within the dust bin assembly․ Remove the filter carefully․ Rinse it thoroughly under cold water until the water runs clear․ Do not use detergents or cleaning agents․
Drying is Key: Allow the filter to air dry completely for a minimum of 24 hours before reinstalling․ Never reinsert a damp filter, as this can damage the motor and void your warranty․ Ensure it’s fully dry to prevent mold or mildew growth․
Frequency: Wash the pre-motor filter at least once a month, or more often if you have pets or allergies․
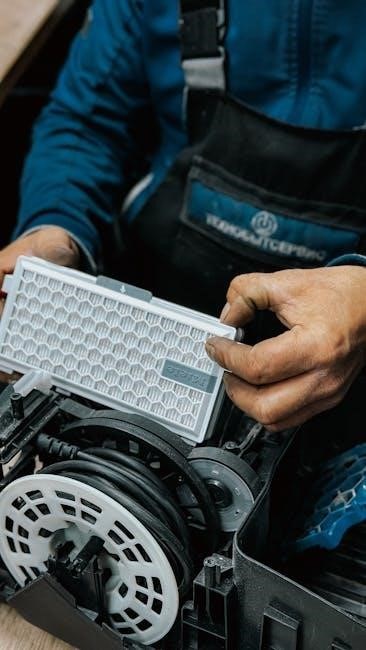
Cleaning the Post-Motor Filter
The post-motor filter plays a vital role in ensuring the air expelled from your Dyson DC14 is clean and free of allergens․ Regular cleaning maintains optimal performance and prevents overheating․
Access & Removal: Locate the post-motor filter, typically housed at the rear of the machine․ Carefully remove the filter cover and then the filter itself․ Gently tap the filter to remove loose dust and debris․
Washing Instructions: Rinse the filter under cold water, avoiding any detergents․ Ensure all visible dirt is removed․ Crucially, allow the filter to air dry completely – a minimum of 24 hours – before reinstallation․
Maintenance Schedule: Clean the post-motor filter every three months, or more frequently if you notice a decrease in suction or a musty odor․ A clean filter equals a healthy machine!
Troubleshooting Common Issues
Diagnose & Resolve: This section provides solutions for typical DC14 problems, like suction loss, brush bar malfunctions, and overheating, ensuring continued cleaning power․
Loss of Suction – Causes and Solutions
Identifying the Problem: A sudden or gradual decrease in suction power is a common concern with the Dyson DC14․ Several factors can contribute to this issue, ranging from simple obstructions to more complex component failures․
Common Causes: First, check the dust bin – a full bin significantly restricts airflow․ Next, inspect the filters; clogged pre-motor or post-motor filters dramatically reduce suction․ Also, examine the hose and wand for blockages, carefully removing any debris․ Finally, verify the brush bar isn’t jammed with hair or fibers․
Troubleshooting Steps: Empty the dust bin completely․ Wash and thoroughly dry both filters before reinstalling․ Detach the hose and wand, using a long object to clear any obstructions․ Ensure the brush bar rotates freely․ If suction remains low after these steps, further inspection of seals and the motor may be required․
Preventative Measures: Regularly empty the dust bin and clean the filters to maintain optimal suction performance and prolong the life of your Dyson DC14․
Brush Bar Not Spinning
Understanding the Issue: A non-rotating brush bar on your Dyson DC14 significantly reduces its cleaning effectiveness, particularly on carpets․ This issue often stems from obstructions or mechanical failures within the brush head assembly․
Common Causes: The most frequent culprit is entangled hair, fibers, or string wrapped around the brush bar․ A broken drive belt is another common cause, preventing power transfer․ Less frequently, a faulty motor or damaged brush bar gearbox can be responsible․
Troubleshooting Steps: Turn off and unplug the vacuum․ Remove the brush bar and carefully clear any debris․ Inspect the drive belt for breaks or stretching; replace if necessary․ Check the motor for any signs of damage․ If the belt is intact and the motor seems functional, the gearbox may require professional attention․
Preventative Maintenance: Regularly remove the brush bar and clear any accumulated debris to prevent jams and ensure smooth operation․
Overheating and Resetting
Recognizing Overheating: Your Dyson DC14 is equipped with a thermal safety cut-out to prevent damage from overheating․ If the machine stops unexpectedly during use, and you notice a warm smell, it has likely triggered this safety feature․
Common Causes: Overheating is usually caused by blocked airways – a full dust bin, clogged filters, or obstructions in the hose or wand․ Excessive use on high power settings, or cleaning very dusty areas, can also contribute․
Resetting Procedure: Turn off and unplug the vacuum․ Allow it to cool for at least 30-60 minutes․ Empty the dust bin and clean or replace the filters․ Check for and remove any blockages in the hose, wand, or floor head; Once cooled, the DC14 should restart normally․
Preventative Measures: Regularly empty the dust bin and clean filters to maintain optimal airflow and prevent future overheating incidents․

Advanced Features & Accessories
Unlock Versatility! Explore specialized tools like the crevice tool, combination tool, and stair tool to tackle diverse cleaning challenges effectively and efficiently․
Expand your cleaning capabilities with these essential attachments․
Using the Crevice Tool
Precision Cleaning: The crevice tool is specifically designed for reaching narrow, hard-to-access areas where dirt and debris accumulate, offering targeted cleaning power․
Effective Applications: Utilize this attachment along baseboards, between cushions, in tight corners, and around furniture legs for a thorough clean․ Its slender profile allows for precise maneuvering․
Proper Technique: Attach the crevice tool securely to the wand or hose․ Apply gentle pressure while guiding the tool along the desired surface․ Avoid forcing it into extremely tight spaces․
Optimizing Results: For optimal suction, ensure the tool is properly aligned with the airflow․ Regularly inspect the tool for blockages and clear any obstructions to maintain peak performance․ This ensures maximum dirt removal․
Versatile Use: Beyond standard crevices, this tool excels at cleaning car interiors, reaching under seats, and detailing dashboards for a spotless finish․
Utilizing the Combination Tool
Versatile Cleaning Solution: The combination tool offers dual functionality, seamlessly switching between a brush for delicate surfaces and a wider nozzle for general cleaning tasks․
Surface Adaptability: Employ the brush component for dusting upholstery, curtains, lampshades, and fragile items․ Rotate to reveal the wider nozzle for cleaning larger, flat surfaces like shelves and countertops․
Effective Dusting: The soft bristles gently lift dust and allergens without causing damage․ Maintain consistent pressure for optimal results, ensuring thorough particle removal․
Seamless Transition: Easily switch between brush and nozzle modes by rotating the tool’s head․ This adaptability makes it ideal for various cleaning scenarios throughout your home․
Regular Inspection: Periodically check the brush for tangled hair or debris and remove any obstructions to maintain its effectiveness․ This ensures consistent cleaning performance․
Stair Tool Functionality
Optimized for Vertical Surfaces: The stair tool is specifically engineered for efficient cleaning of stairs, reaching into corners and along edges with ease․
Enhanced Maneuverability: Its compact design allows for effortless navigation on steps, ensuring comprehensive cleaning without cumbersome movements․
Effective Edge Cleaning: The tool’s shape effectively targets dust and debris accumulated along stair edges, providing a thorough clean․
Combined Brush & Suction: Utilizing both brush agitation and powerful suction, the stair tool loosens and removes embedded dirt and allergens from carpeted or hard stairs․
Consistent Pressure: Apply consistent, moderate pressure while moving the tool across each step for optimal cleaning results․ Avoid excessive force to prevent damage․
Regular Checks: Inspect the brush head regularly for obstructions like hair or threads, ensuring peak performance during each use․

Dyson DC14 Specific Repairs (Common)
DIY Solutions: This section details common DC14 repairs, empowering you to address issues like brush bar replacement, motor checks, and hose inspections efficiently․
Replacing the Brush Bar
Safety First: Before commencing, always disconnect your Dyson DC14 from the power source to prevent accidental activation and potential injury․ Accessing the brush bar requires removing the soleplate – typically secured with several screws․
Removal Process: Carefully unscrew and detach the soleplate, then gently remove the brush bar assembly․ Inspect the old brush bar for tangled hair, debris, or damage․ A worn or damaged brush bar significantly reduces cleaning effectiveness․
Installation: Align the new brush bar correctly within the housing, ensuring the bristles rotate freely․ Reattach the soleplate, securing it firmly with the screws․ Double-check that all screws are tightened to prevent rattling during operation․
Testing: Power on the DC14 and test the brush bar’s rotation on various floor surfaces․ A properly installed brush bar will spin smoothly and effectively agitate dirt and debris for optimal cleaning performance․
Motor Troubleshooting
Initial Checks: If your Dyson DC14 motor isn’t functioning, first verify the power cord and outlet are working correctly․ Inspect the filters – a clogged filter restricts airflow and can cause the motor to overheat and shut down․ Ensure the dust bin isn’t full․
Overheating: If the motor overheats, allow it to cool for at least 30 minutes before attempting to restart․ Persistent overheating indicates a potential blockage or motor fault․
Motor Sounds: Unusual noises, like squealing or grinding, suggest internal motor damage․ Do not attempt to disassemble the motor yourself; this requires specialized knowledge and tools․
Professional Repair: For complex motor issues, contact Dyson customer support or a qualified appliance repair technician; Attempting DIY repairs on the motor can void your warranty and pose safety risks․
Hose and Wand Inspection & Repair
Regular Inspection: Routinely check the Dyson DC14’s hose and wand for cracks, holes, or blockages․ These can significantly reduce suction power and overall cleaning efficiency․ Pay close attention to the points where the hose connects to the machine and attachments․
Blockage Removal: If a blockage is suspected, detach the hose and wand․ Use a long, flexible object (like a broom handle) to gently dislodge any obstructions․ Avoid using sharp objects that could damage the internal lining․
Leak Repair: Small cracks can sometimes be temporarily sealed with strong tape, but replacement is recommended for lasting repairs․ A severely damaged hose or wand should be replaced entirely․
Connection Points: Ensure secure connections at all joints․ Loose connections create air leaks, diminishing suction․ Inspect the seals for wear and tear, replacing them if necessary․